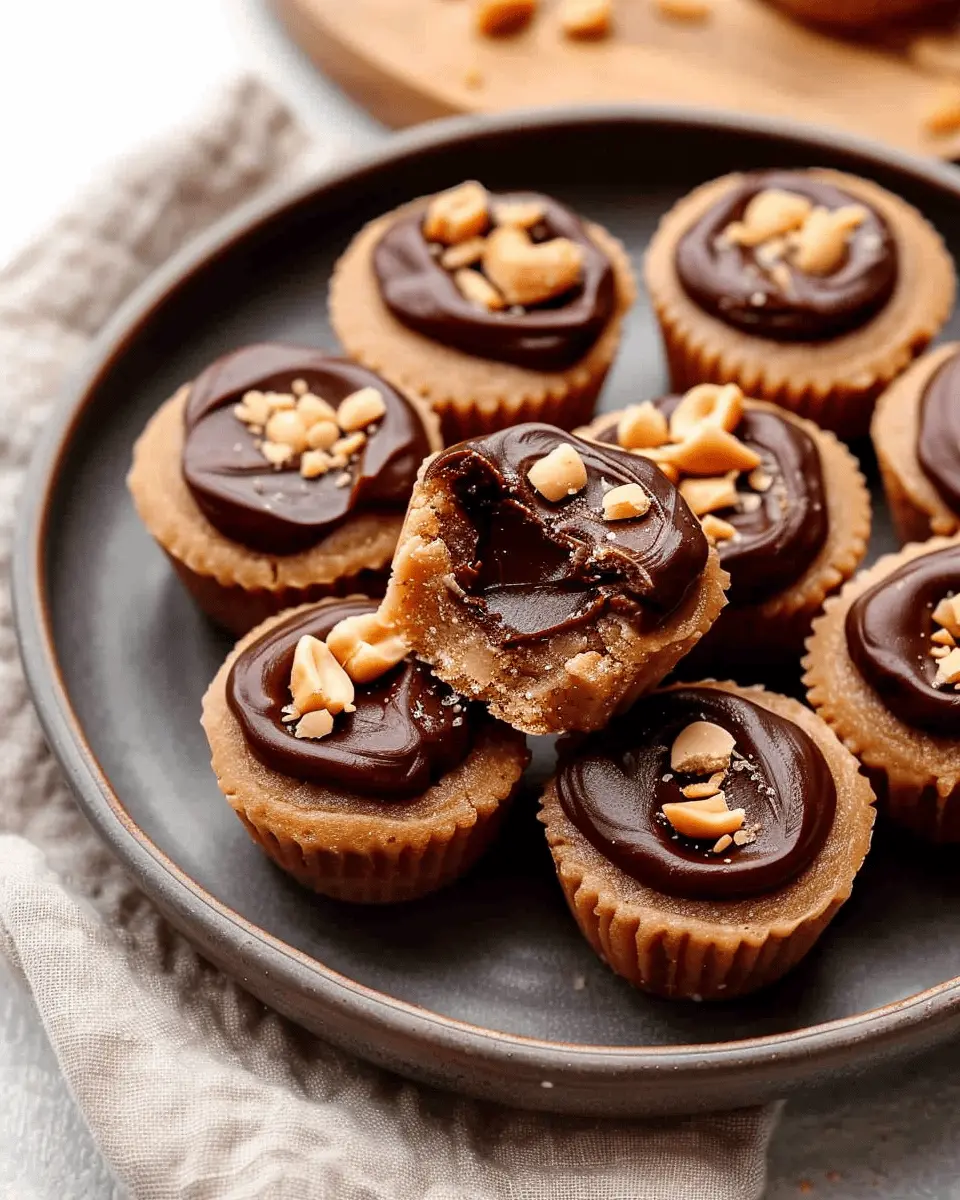
Introduction to Peanut Butter Fudge Cups
When it comes to indulgent desserts, peanut butter fudge cups stand out as a delightful treat that perfectly balances flavor and texture. Imagine biting into a creamy, melt-in-your-mouth layer of fudge, only to be met with the rich depth of peanut butter—doesn’t that sound irresistible? These little cups of joy are not only easy to make but also incredibly satisfying, making them a must-try for anyone looking to satisfy a sweet tooth.
Why Peanut Butter Fudge Cups are a Must-Try Dessert
Peanut butter fudge cups truly offer the best of both worlds: the nostalgia of childhood snacks combined with adult sophistication. Whether you’re hosting a gathering, planning a cozy night in, or just craving a sweet fix, they fit the bill perfectly. Plus, they’re versatile! You can customize them by swapping in different types of nut butter or incorporating ingredients like crushed pretzels or sea salt for added crunch and flavor.
Think about it: how often do you find a dessert that’s so widely loved? According to the National Peanut Board, over 94% of American households have peanut butter in their kitchen. This readily available ingredient is often regarded for its taste and nutritional benefits (like protein and healthy fats), making your fudge cups not just delicious but somewhat wholesome too!
Here’s a fun tip: make a double batch of these peanut butter fudge cups and share them at an office potluck or with friends. You’ll not only impress them but might also receive requests for your secret recipe.
Easy to Make at Home
The beauty of peanut butter fudge cups lies in their simplicity. With just a few ingredients, you can whip up a delectable treat that feels gourmet. You don’t need to be a master chef to succeed with this recipe. In fact, you could involve friends or family in the process for a fun bonding experience.
So, are you ready to experience the magic of peanut butter fudge cups? Let’s dive into the ingredients and process that will transform your kitchen into a mini dessert factory! Check out resources from reputable food blogs like AllRecipes for inspiration or tips as you embark on your fudge-making adventure!
Ingredients for Peanut Butter Fudge Cups
Creating delectable peanut butter fudge cups is a rewarding experience that combines simple ingredients with a touch of culinary magic. Here’s what you’ll need to whip up this mouthwatering treat!
Essential Ingredients for the Cookie Base
The foundation for your fudge cups is a buttery cookie base that pairs beautifully with the rich filling. Gather these essential ingredients:
- All-purpose flour: This forms the backbone of your cookie, lending structure and texture.
- Unsalted butter: Use softened butter for that melt-in-your-mouth quality.
- Granulated sugar: A touch of sweetness to balance the savory notes.
- Brown sugar: For a hint of caramel flavor and moisture.
- Baking soda: To give the cookies a lift and promote a chewy texture.
- Salt: Enhances flavor and balances sweetness.
- Vanilla extract: Adds a lovely aroma and depth to the base.
Ingredients for the Gooey Fudge Filling
Now, let’s dive into the heart of your peanut butter fudge cups—the gooey filling! You’ll crave these ingredients:
- Creamy peanut butter: This is a must! Use high-quality peanut butter for the best flavor.
- Sweetened condensed milk: This provides a rich and creamy consistency for the fudge.
- Chocolate chips: Semi-sweet or dark chocolate works best for that irresistible chocolatey flavor.
Once you have these components ready, you’ll be well on your way to creating something your friends and family will love. These peanut butter fudge cups are perfect for any occasion, from casual get-togethers to sweet treats after dinner! For more inspiration, check out this guide to baking essentials and elevate your baking game.
Preparing Peanut Butter Fudge Cups
Creating the perfect peanut butter fudge cups is a delightful and satisfying process! These delicious treats combine the rich flavor of peanut butter with a creamy fudge filling, making them a favorite for any occasion. Follow these simple steps, and soon you’ll have a batch of delightful cups that are perfect for sharing (or not)!
Preheat the Oven and Prep the Muffin Pan
First things first—preheat your oven to 350°F (175°C). A well-preheated oven ensures even baking, which is crucial for achieving that soft, chewy cookie base. While the oven is working its magic, take a moment to prepare your muffin pan. You’ll want to use a non-stick muffin pan or line it with paper liners to make removal a breeze later on.
- If you’re using a non-stick pan, a light greasing with cooking spray can help prevent sticking.
- Gather your ingredients to streamline the process: you’ll need flour, sugar, butter, eggs, vanilla, and, of course, peanut butter!
Mix the Cookie Dough
In a mixing bowl, cream together 1 cup of softened butter and 1 cup of sugar until the mixture is light and fluffy. This step is crucial for introducing air into the dough, resulting in a tender cookie. Add one large egg and 1 teaspoon of vanilla extract, mixing until well combined. Then gradually add 2 cups of all-purpose flour and a pinch of salt to the mixture, stirring until a thick dough forms.
Remember, the secret to perfect cookie dough is not to overmix. You want just enough mixing to combine all ingredients without developing gluten, which can lead to tough cookies. If you’re interested in some science behind baking, check out this great article from King Arthur Baking that dives deeper into the art and science of cookies.
Portion and Bake the Cookie Cups
Now it’s time to portion out the dough! Using a cookie scoop or your hands, divide the dough into evenly-sized balls, about 1.5 inches in diameter. Place each ball into the greased muffin pan, gently pressing them down to form small cups.
Bake in the oven for about 10-12 minutes or until the edges are lightly golden. Don’t worry if they look a bit underdone; they will continue to cook slightly as they cool in the pan. Let them cool in the pan for about 5 minutes, then transfer them to a wire rack to cool completely. What a delightful aroma wafting through your kitchen, right?
Create the Fudge Wells
Once the cookie bases have cooled, it’s time to create the wells for your fudge filling. Using the back of a teaspoon or your thumb, gently press down the center of each cookie cup to form a well. This is where the magic happens—where the fudge will soon reside!
Don’t worry if the cookie cracks a little; it’s all part of the rustic charm of homemade sweets. Plus, all those delicious flavors will come together in no time.
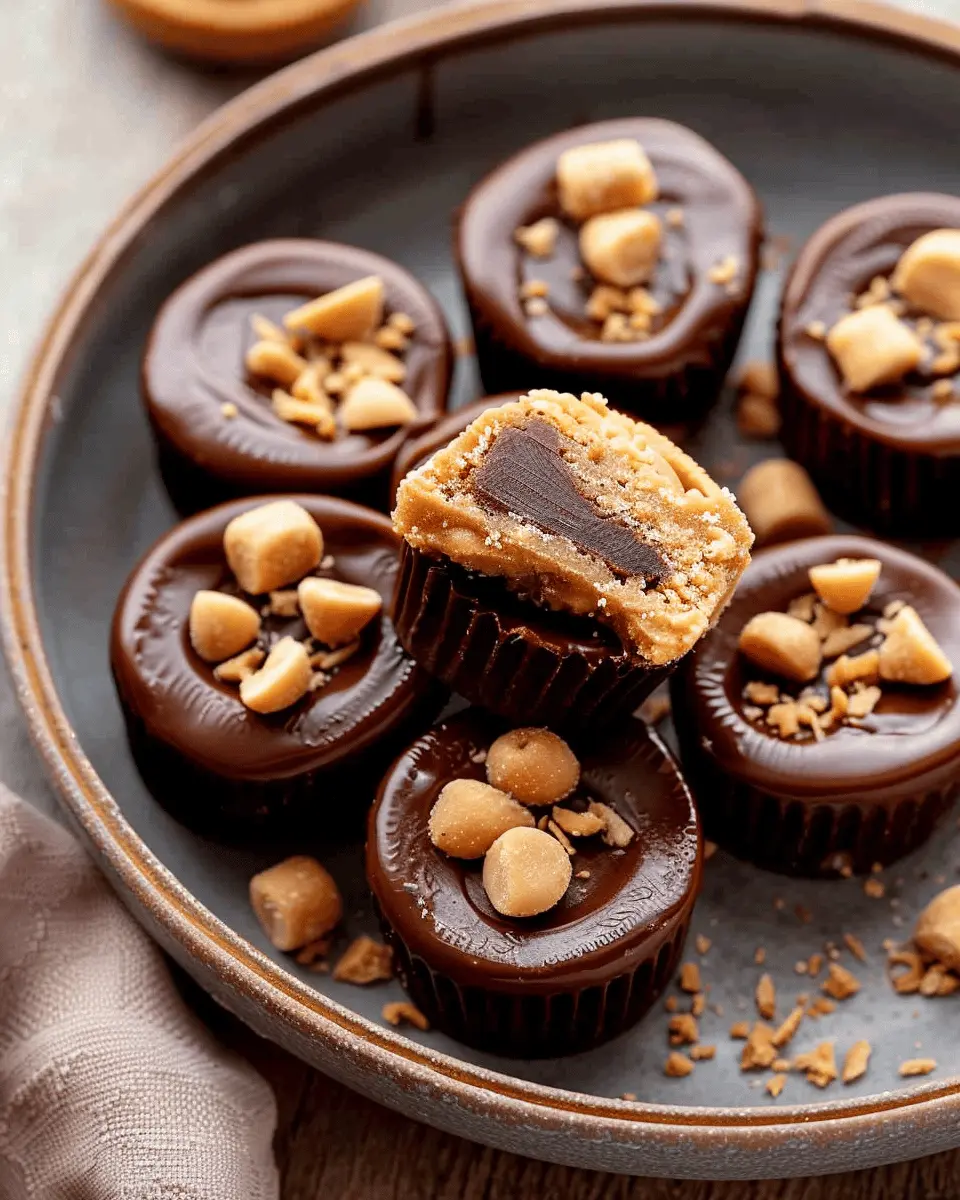
Prepare the Fudge Filling and Pipe into Cookie Cups
For the fudge filling, melt 1 cup of semi-sweet chocolate chips and combine it with 1/2 cup of sweetened condensed milk in a microwave-safe bowl. Heat in 30-second increments, stirring until smooth. Once melted, add 1/2 cup of creamy peanut butter, stirring until fully incorporated.
To fill your cups, you can use a piping bag or simply spoon the fudge into the wells. Make sure to fill each cookie cup generously—this is what will make these peanut butter fudge cups so wonderfully rich and satisfying!
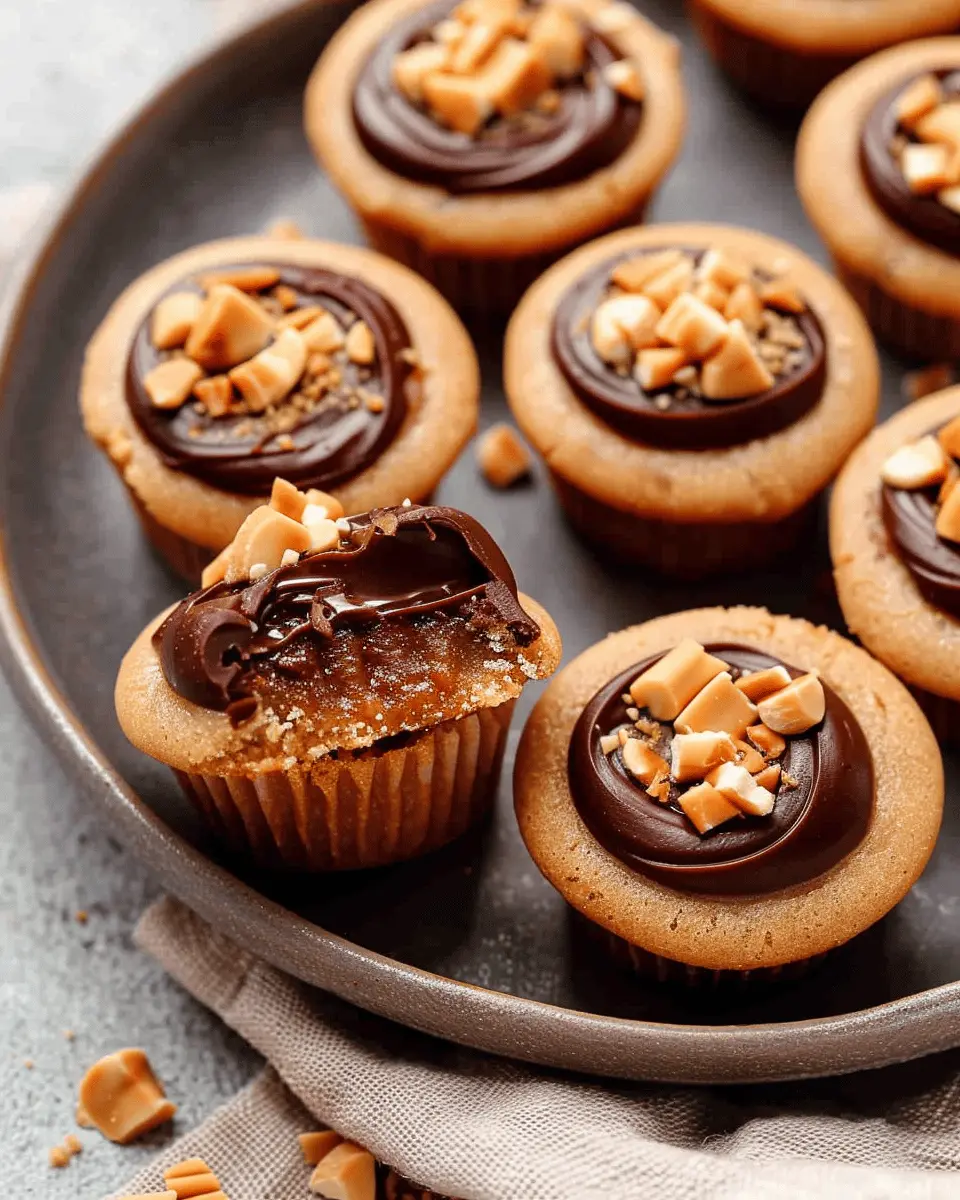
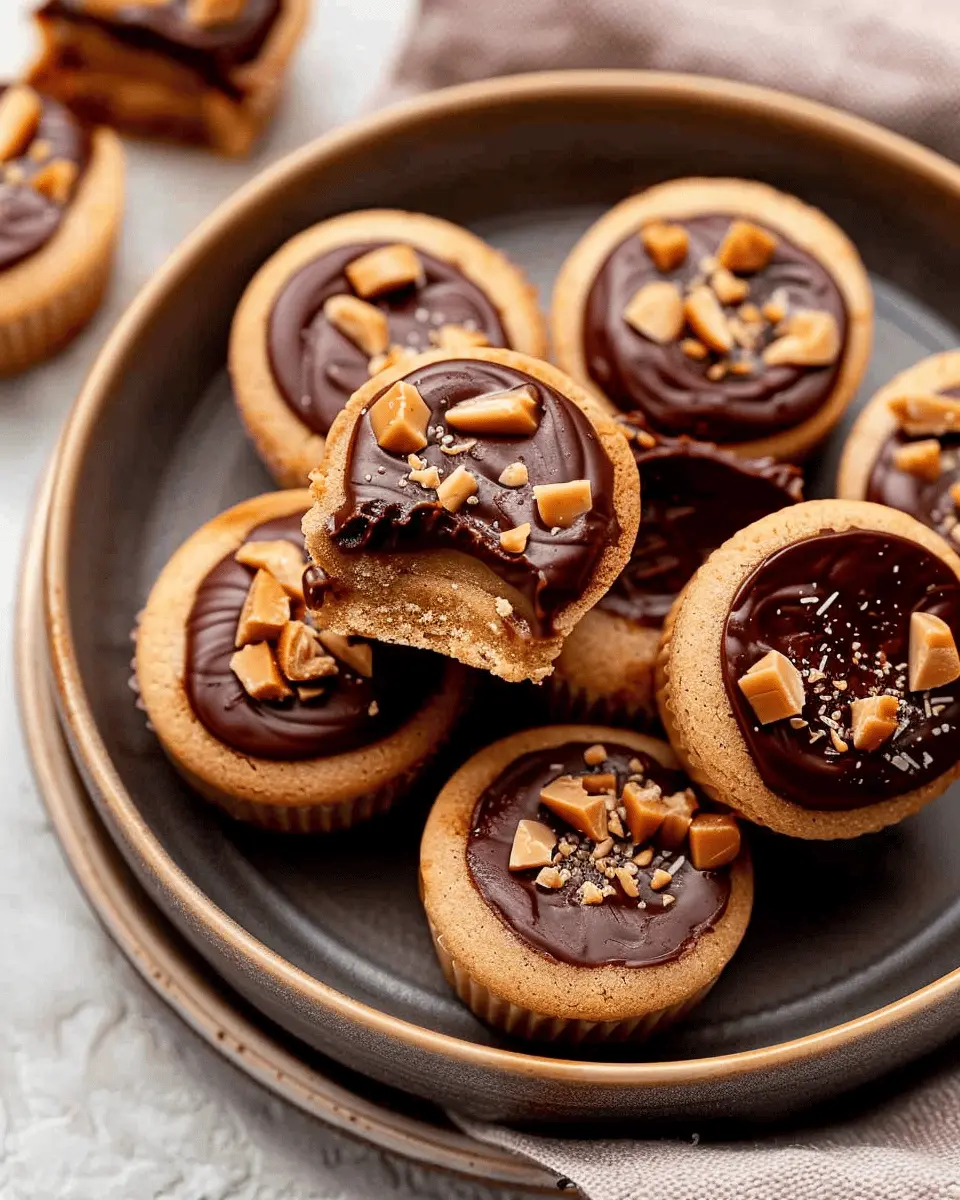
Drizzle with Extra Peanut Butter and Serve
To add an appealing touch, consider drizzling some additional melted peanut butter over the fudge before serving. Simply warm a couple of tablespoons of peanut butter in the microwave and use a fork to drizzle it over your finished cups. Look at those beautiful layers!
Once drizzled, your peanut butter fudge cups are ready to wow your friends or family. Serve them at your next gathering, or save them for a well-deserved treat during the week. You’ve just created something truly special, and the best part? It’s homemade! Enjoy every delicious bite.
Variations on Peanut Butter Fudge Cups
When it comes to peanut butter fudge cups, there are endless ways to personalize these delightful treats! Whether you’re looking for a little crunch or accommodating dietary needs, the following variations will keep your fudge cups exciting and tailored to your taste.
Adding Nuts or Sprinkles for Crunch
One of the simplest yet most effective ways to elevate your peanut butter fudge cups is by incorporating some crunch. Try adding chopped nuts like peanuts, almonds, or pecans right before the fudge sets. This gives a delightful texture contrast and ups the nutty flavor profile. Alternatively, colorful sprinkles not only make these cups visually appealing but also add a fun, playful element—perfect for parties or a casual movie night! Just remember to mix them in gently to avoid losing the smooth consistency of your fudge.
Swapping Ingredients for Dietary Preferences
Are you or your friends following specific dietary guidelines? No worries! These peanut butter fudge cups can easily adapt. Substitute regular peanut butter with natural or almond butter for a different spin. If you’re dairy-free, there are fantastic options available, like coconut oil or plant-based butters. For those with a sweet tooth but looking to reduce sugar, consider using honey or maple syrup instead. If you’re uncertain where to find these ingredients, check out food blogs like Minimalist Baker or health-focused sites for inspiration.
Embrace creativity in your kitchen, and feel free to experiment with your favorite flavors. With these variations, your peanut butter fudge cups can be a delightful crowd-pleaser, no matter the occasion!
Cooking Tips and Notes for Peanut Butter Fudge Cups
Common Mistakes to Avoid
Making peanut butter fudge cups might sound easy, but there are a few pitfalls you can stumble into. Here are some tips to keep your fudge from going awry:
- Measure Accurately: Precision is crucial. Too much or too little of any ingredient can affect the texture and flavor.
- Don’t Overheat: When melting chocolate, do it slowly over low heat. Burnt chocolate is a hard no!
- Cool Properly: Let your fudge cups cool completely before removing them from the molds. Patience pays off!
Storing the Fudge Cups for Freshness
To keep your peanut butter fudge cups fresh and tasty, be sure to:
- Refrigerate: Store them in an airtight container in the fridge for up to two weeks. This prevents them from getting too soft or melting.
- Freeze for Longer Storage: If you have leftovers, they can be frozen for up to three months. Just make sure to layer parchment paper between them to avoid sticking.
Following these tips will help ensure your fudge cups are delicious every time! For more on candy storage, check out this guide from The Spruce Eats.
Serving Suggestions for Peanut Butter Fudge Cups
Pairing with Ice Cream or Whipped Cream
Elevate your peanut butter fudge cups by drizzling them with warm chocolate sauce and serving them alongside a scoop of creamy vanilla ice cream or a dollop of whipped cream. The contrast between the rich, fudgy texture and the cool creaminess creates a delightful experience. For an extra twist, consider pairing them with flavors like salted caramel or even a fruity scoop—strawberry works wonders!
Perfect Occasions for Serving These Treats
Whether it’s a casual movie night, birthday celebration, or a cozy gathering with friends, peanut butter fudge cups are a crowd-pleaser. They also make fantastic homemade gifts for holidays or special occasions. Picture this: wrapping them up in a cute box and adding a heartfelt note. Plus, who can resist the allure of a treat that combines chocolate and peanut butter? For more inspiring serving ideas, visit sources like Serious Eats or Food Network for creative twists on classic desserts.
These suggestions not only highlight the versatility of the peanut butter fudge cups but also invite you to get creative in your kitchen!
Time Breakdown for Peanut Butter Fudge Cups
Preparation Time
Getting started on your peanut butter fudge cups is a breeze! You’ll need about 15 minutes to gather your ingredients and mix them all together. It’s a perfect opportunity to put on your favorite playlist and enjoy the cooking process.
Cooking Time
The actual cooking time is quite minimal, clocking in at around 10 minutes. Just enough time to melt your fudge ingredients on a gentle heat until they come together in a creamy bliss.
Chilling Time
Once you’ve poured your mixture into the cups, expect to chill them for at least 30 minutes. This step is essential for achieving that perfect fudge texture—trust me, it’s worth the wait!
Total Time
In total, you’re looking at roughly 55 minutes from start to finish. So, in under an hour, you can indulge in your homemade peanut butter fudge cups! For more time-saving tips and tricks, check out the Taste of Home website for some useful resources.
Nutritional Facts for Peanut Butter Fudge Cups
Calories and Macronutrients Overview
Peanut butter fudge cups are not just a delicious treat; they’re a satisfying snack packed with nutrition! Each cup typically contains around 100 calories, making them a great option for a midday energy boost. In terms of macronutrients, you can expect approximately:
- Fat: 8g (mostly healthy fats from peanut butter)
- Protein: 3g (a decent source of plant-based protein)
- Carbohydrates: 6g (including natural sugars)
For more details, check out This Article on Healthy Snacking to understand more about macronutrients.
Highlights of Nutritional Benefits
These peanut butter fudge cups aren’t just tasty; they also offer several health perks:
- Rich in Protein: The protein content helps keep you full and energized throughout the day.
- Healthy Fats: The fats from peanuts are heart-healthy and may aid in reducing bad cholesterol levels.
- Vitamins and Minerals: Peanut butter is loaded with nutrients like magnesium, potassium, and vitamin E, supporting overall health.
So next time you indulge in these bite-sized delights, remember that they offer more than just sweetness!
FAQs about Peanut Butter Fudge Cups
Can I Use Natural Peanut Butter Instead?
Absolutely! You can use natural peanut butter in your peanut butter fudge cups, but keep in mind that its texture may be a bit different. Natural peanut butter tends to be runnier and less sweet than conventional brands. If you love that rich, wholesome flavor, consider adding a little extra sweetener or adjusting the cocoa powder for balance. For a delightful twist, try experimenting with different nut butters like almond or cashew.
How Long Will Leftovers Last?
If you manage to have any leftovers (which is rare!), you can store your peanut butter fudge cups in an airtight container in the refrigerator. They should stay fresh for about a week. Just ensure that they’re kept away from strong odors—nobody wants their fudge tasting like last week’s leftovers!
Can I Freeze Peanut Butter Fudge Cups?
Definitely! Freezing your peanut butter fudge cups is a great way to extend their life. Just pop them into a freezer-safe container or freezer bag, making sure to separate layers with parchment paper to prevent sticking. They can last up to three months in the freezer. When you’re ready to indulge again, simply thaw them in the fridge for a few hours or at room temperature for a quick treat.
If you’re looking for more tips on storing or flavor variations, check out resources like The Kitchn or Food Network for inspiration!
Conclusion on Peanut Butter Fudge Cups
Recap of Why These Cookies Delight
In summary, peanut butter fudge cups are more than just a treat; they’re an experience. Their rich, creamy texture combined with that irresistible nutty flavor makes them a standout dessert. Whether you’re sharing them at a party or enjoying them solo after a long day, these cups provide a perfect blend of sweet and salty.
The joy of making them lies not only in the process but in the delightful reactions from friends and family. Plus, the flexibility of the recipe allows for fun variations. If you haven’t tried these yet, it’s time to grab the ingredients and dive in! Check out more peanut butter inspiration here.
PrintPeanut Butter Fudge Cups: Indulgent Treats You Can Make at Home

A delicious recipe for homemade peanut butter fudge cups that are easy to make and incredibly indulgent.
- Prep Time: 20 minutes
- Cook Time: 5 minutes
- Total Time: 1 hour 25 minutes
- Yield: 12 cups 1x
- Category: Dessert
- Method: No-bake
- Cuisine: American
- Diet: Vegetarian
Ingredients
- 1 cup peanut butter
- 1/2 cup powdered sugar
- 1/2 cup graham cracker crumbs
- 1 cup chocolate chips
- 2 tablespoons coconut oil
Instructions
- In a bowl, mix together peanut butter, powdered sugar, and graham cracker crumbs until well combined.
- Melt chocolate chips and coconut oil together in a microwave-safe bowl.
- Line a muffin tin with cupcake liners.
- Press a spoonful of the peanut butter mixture into each cupcake liner.
- Pour melted chocolate over the peanut butter layer in each liner.
- Refrigerate until set for about 1 hour.
- Remove from muffin tin and serve.
Notes
- For a richer flavor, use dark chocolate instead of regular chocolate chips.
Nutrition
- Serving Size: 1 cup
- Calories: 150
- Sugar: 10g
- Sodium: 50mg
- Fat: 10g
- Saturated Fat: 4g
- Unsaturated Fat: 6g
- Trans Fat: 0g
- Carbohydrates: 12g
- Fiber: 1g
- Protein: 4g
- Cholesterol: 0mg
Keywords: PEANUT BUTTER FUDGE CUPS