Easy Banana Pudding Recipe Outline
Creating the perfect easy banana pudding doesn’t have to be a daunting task. In fact, this delightful dessert can be whipped up in no time with just a few simple ingredients! Let’s take a peek at an outline that helps you master this classic treat that’s sure to impress family and friends. Whether you’re a seasoned home chef or a budding cooking enthusiast, you’ll find this guide straightforward and friendly.
Gathering Your Ingredients
To make your life easier, let’s start with a handy list of essential ingredients you’ll need for this easy banana pudding recipe:
- Ripe bananas (typically 3-4, depending on your taste)
- Vanilla pudding mix or homemade vanilla custard
- Whole milk (or a nut milk alternative, if preferred)
- Whipped cream (store-bought or homemade)
- Vanilla wafers (these add that classic texture)
- Optional: a dash of cinnamon or some crushed cookies for garnish
If you’re curious about alternatives and variations, you might want to check out food blogs like Serious Eats for inspiration on different takes on this beloved dessert.
Preparing the Pudding Base
The magic begins by preparing your vanilla pudding or custard. If you want to go the quick route, instant pudding mix will do. Simply whisk together the pudding mix with milk until it thickens. The joy of homemade pudding, however, can’t be overlooked! A stovetop vanilla custard brings a creaminess that complements the bananas beautifully.
- Quick Tip: Allow your pudding to chill in the fridge while you prepare the rest of your ingredients. This will enhance its flavor and texture!
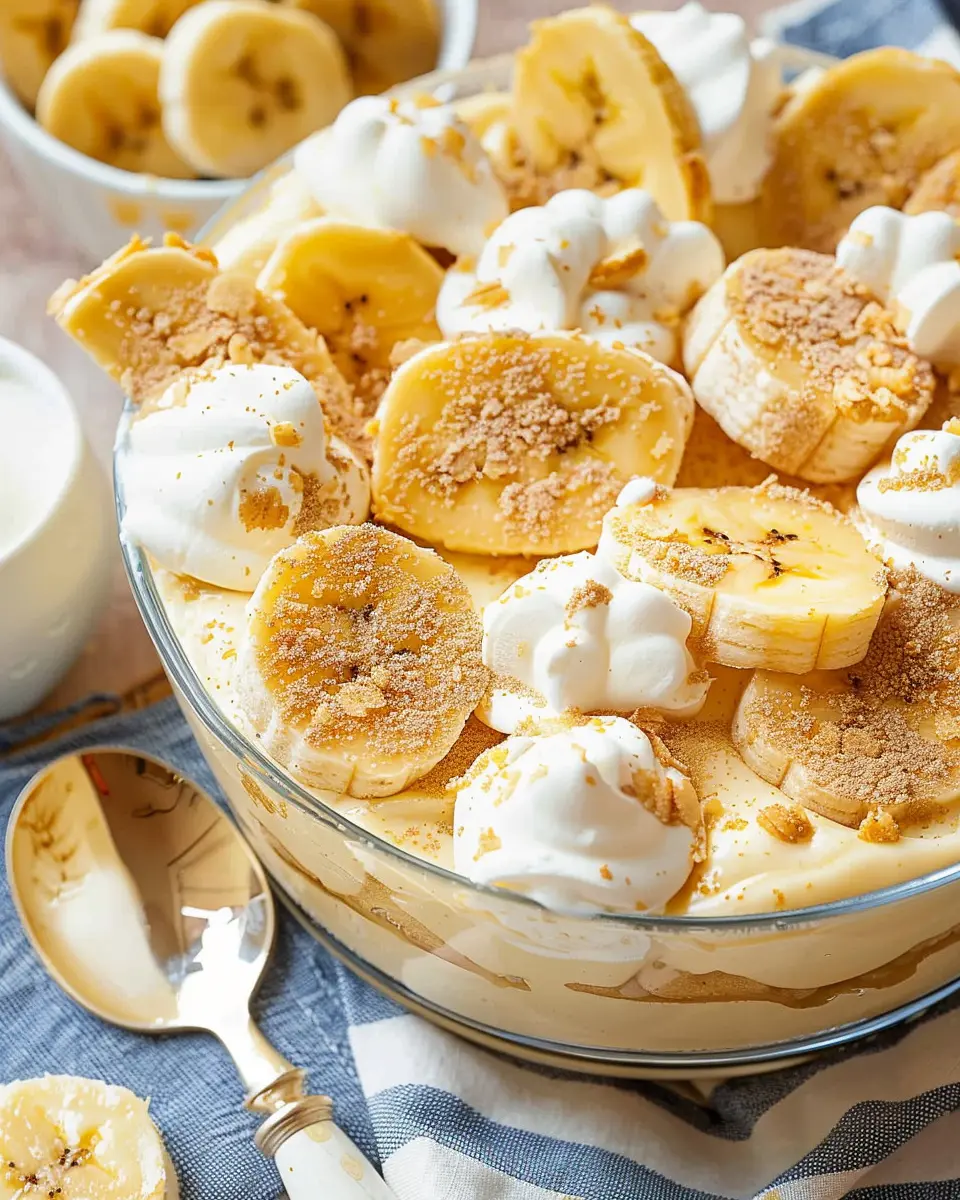
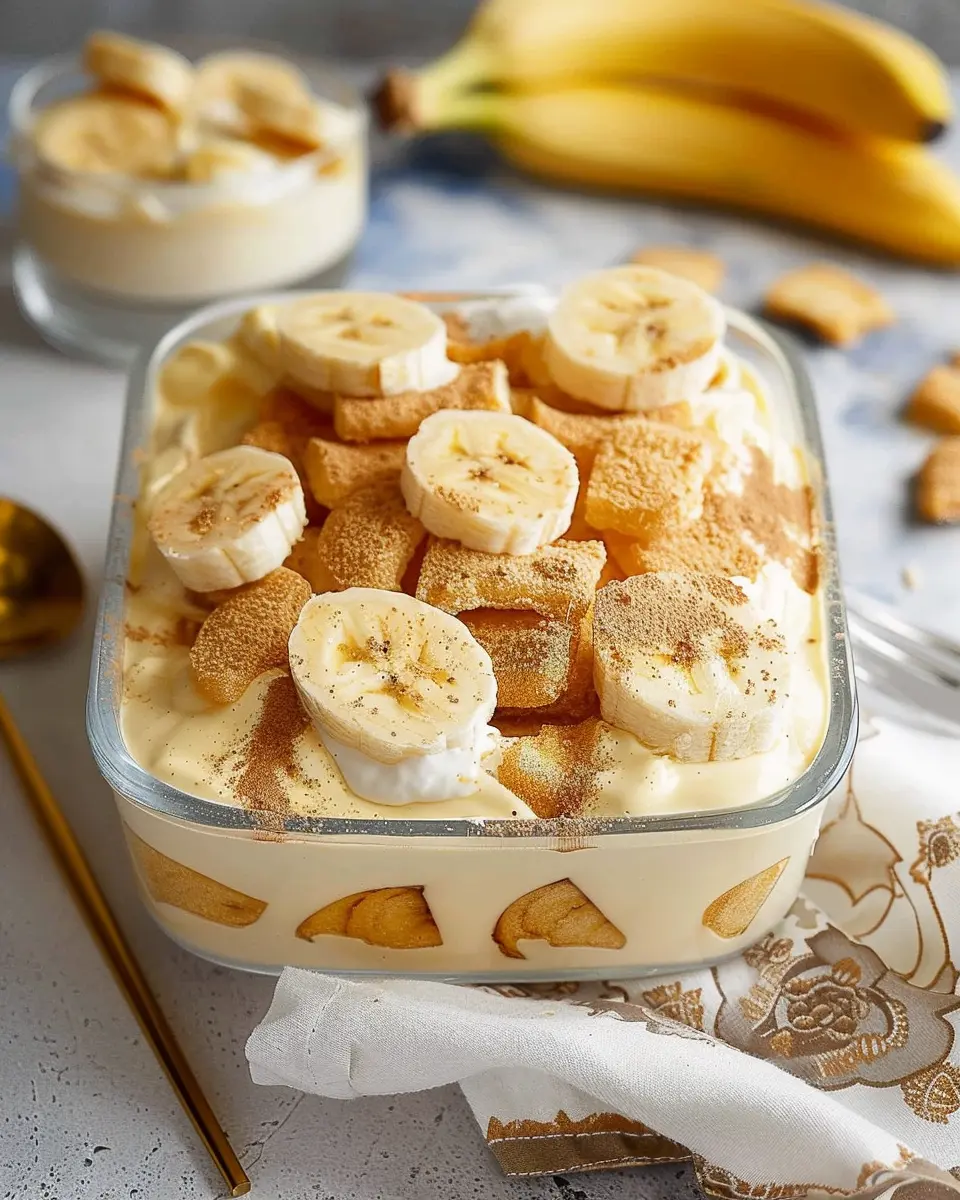
Layering Your Banana Pudding Masterpiece
Now comes the fun part—layering! You’ll want to create a beautiful, inviting dessert that is as pleasing to the eye as it is tasty. Here’s how you do it:
- Start with a layer of vanilla wafers on the bottom of your serving dish.
- Add a layer of sliced bananas on top of the cookies.
- Spread a layer of pudding over the bananas, covering them completely.
- Repeat this layering process until you reach the top of your dish or run out of ingredients. You can finish with a generous layer of whipped cream or more bananas.
This multi-layered approach not only tastes fantastic, but it also gives a lovely visual effect—perfect for garnish and guests!
The Final Touch: Chill and Serve
The last step in creating your easy banana pudding is to let it chill in the refrigerator for at least a few hours (or overnight if you can wait!). This helps the flavors meld together beautifully and gives the dessert a creamy, dreamy texture.
When you’re ready to serve, consider offering some fresh mint leaves for an aromatic garnish or perhaps some crushed vanilla wafers for added crunch.
Enjoying Your Creation
Take a moment to relish in your accomplishment! There’s something inherently satisfying about serving a homemade dessert. As you’re enjoying your easy banana pudding, feel free to share it with your friends or on social media, telling everyone about your delicious creation!
An interesting statistic might resonate with your audience: Did you know that desserts like banana pudding can evoke nostalgia, often reminding us of childhood or family gatherings? A great reminder that food is not just about sustenance but also about connection and memories.
Easy Banana Pudding Recipe Variations to Try
Feeling adventurous? Here are a couple of variations to the classic recipe you might want to explore:
- Peanut Butter Banana Pudding: Just swirl in some creamy peanut butter into your pudding base. It adds a rich, nutty flavor that pairs well with bananas.
- Chocolate Lovers Banana Pudding: Use chocolate pudding instead of vanilla for a decadent chocolate twist.
This leads us to the heart of the matter: Making the easy banana pudding recipe truly your own! Adapt it to suit your tastes or dietary needs.
So there you have it—an outline to guide you in creating the perfect easy banana pudding. As you get ready to tackle this recipe, remember to savor each step and enjoy the journey as much as the final result. Happy cooking!
Introduction to Easy Banana Pudding
Why is Banana Pudding a Classic Dessert?
Banana pudding has that lovely capability of transporting you back to your childhood. Why is it a classic? Perhaps it’s the incredibly simple combination of layers—about as comforting as a warm hug on a chilly night. Made with creamy vanilla pudding, fresh bananas, and delightful vanilla wafers, this dessert embodies nostalgia and simplicity. Plus, with everyone from Southern grandmothers to modern-day dessert aficionados showcasing their versions, it’s a recipe that never seems to go out of style.
Did you know that banana pudding first gained popularity in the mid-20th century? While many people cherish the easy banana pudding recipe their families have passed down, others have embraced creative spins, incorporating everything from chocolate to peanut butter for a fun twist. You can dive deeper into the history of this beloved dessert through resources like Smithsonian Magazine.
Personal Anecdote: My First Experience with Banana Pudding
I still vividly recall the first time I tried homemade banana pudding. I was at a summer barbecue when my friend’s mother brought out a massive bowl filled with this sunny, creamy delight. The moment I took my first bite, I was hooked—the smoothness of the pudding combined with the sweetness of ripe bananas was nothing short of heavenly. In that instant, I realized that this was not mere food; it was an invitation to create memories, one spoonful at a time.
The Appeal of Homemade Banana Pudding over Store-Bought
While you might be tempted to grab a pre-packaged banana pudding from the grocery store, nothing compares to the richness and flavor of homemade versions. When you whip up easy banana pudding in your own kitchen, you have complete control over the ingredients, ensuring that each bite is packed with fresh flavors and genuine love.
Consider these benefits of making your own banana pudding:
- Quality Ingredients: You choose the freshest bananas and highest quality vanilla, avoiding artificial flavors and preservatives.
- Flavor Customization: Feel free to experiment! Add extra toppings like whipped cream or even a sprinkle of cinnamon.
- Nostalgic Experience: Making it yourself turns dessert into a cherished family activity.
If you’re ready to whip up a batch of comfort, let’s jump into the recipe for easy banana pudding. It’s not just a treat; it’s an experience!
Ingredients for Easy Banana Pudding
Essential Ingredients for the Pudding Base
When you’re whipping up a bowl of easy banana pudding, a few essential ingredients will set the foundation for success:
- Whole Milk: This forms the creamy base. You can substitute with almond or oat milk for a dairy-free version.
- Granulated Sugar: Provides the sweetness – don’t skimp on this for that delightful flavor.
- Cornstarch: This is what thickens your pudding, giving it that velvety texture.
- Eggs: Rich and creamy, they add richness and stability to your pudding.
Importance of Fresh Bananas and Vanilla Wafers
The star of any easy banana pudding is undeniably the fresh bananas. They need to be ripe but not overly mushy—this ensures the perfect texture. As for the vanilla wafers, they should be crisp to create that beautiful contrast with the creamy pudding. If you’re feeling adventurous, consider using homemade wafers for an extra special touch!
Possible Ingredient Substitutes
Don’t have everything on hand? No worries! Here are a few swaps you can consider:
- Sugar: Brown sugar will give it a caramel-like flavor.
- Eggs: For a vegan twist, try using flaxseed meal mixed with water.
- Vanilla Wafers: Any cookie can work; just crush them up for that classic layered texture.
For a deeper dive into the chemistry of ingredients, check out Serious Eats for some great insights!
Now that you’re equipped with the right ingredients, you’re ready to create a delicious batch of easy banana pudding that your friends and family will love. So choose your favorites, get cooking, and enjoy every creamy bite!
Step-by-Step Preparation of Easy Banana Pudding
Banana pudding is a classic dessert that brings back memories of warm family gatherings and sunny days. If you’re new to the kitchen or just looking for a simple yet delicious recipe, allow me to guide you through the seamless preparation of this easy banana pudding. Grab your apron, and let’s dive into the step-by-step process!
Gather and Prepare Your Ingredients
Before diving into preparation, it’s important to gather all your ingredients. This not only saves time but also ensures you have everything you need on hand. Here’s what you’ll require:
- 2 cups of milk
- 1 cup of sugar
- 1/2 cup of cornstarch
- 1/2 teaspoon of salt
- 1 teaspoon of vanilla extract
- 8 ounces of cream cheese (softened)
- 1 box of vanilla wafers
- 4 ripe bananas (sliced)
- Whipped cream (for topping)
Pro tip: Be sure to choose ripe bananas for the best flavor! Not only do they add natural sweetness, but they also create a creamy texture when layered with the other ingredients.
Make the Pudding Mixture
Now that you’ve got everything ready, let’s jump into making that delicious pudding. In a medium saucepan over medium heat, combine the milk, sugar, cornstarch, and salt. Continuously whisk the mixture until it starts to thicken, which should take about 8-10 minutes. Once it’s bubbling, stir in the vanilla extract.
Here’s a quick tip: Using a whisk will help prevent lumps and create a smooth texture for your pudding, making your easy banana pudding even more delightful!
Combine Cream Cheese and Other Ingredients
In a large mixing bowl, blend the softened cream cheese until smooth. Gradually add the warm pudding mixture to the cream cheese, whisking continuously until the mixture is fully combined and silky. This step is crucial because it ensures that the cream cheese is incorporated evenly without lumps.
At this stage, don’t hesitate to taste the pudding—it’s a great way to double-check that the flavors are just right!
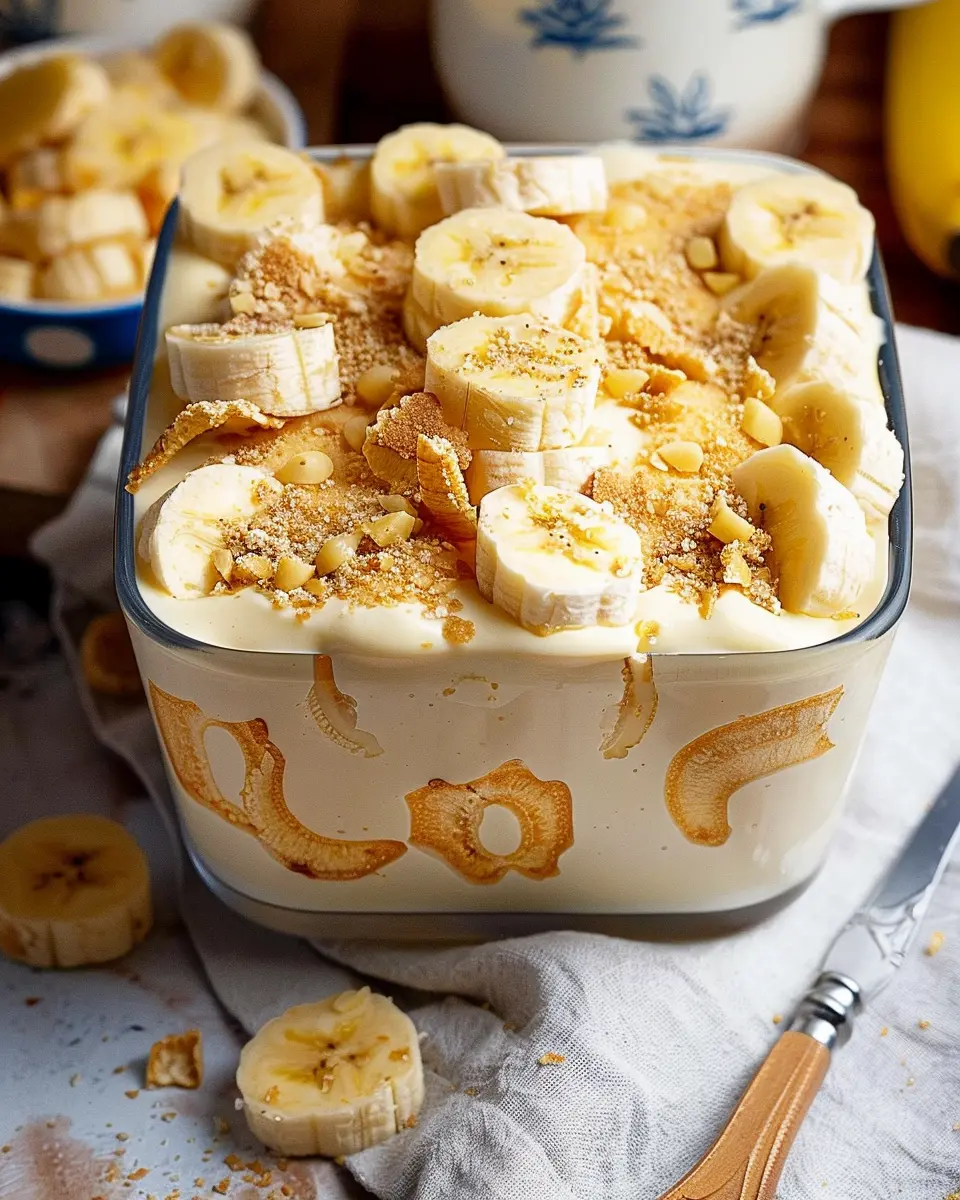
Layer the Ingredients in the Dish
Now comes the fun part! Grab a trifle dish or any large glass bowl you have on hand. Start by adding a layer of vanilla wafers at the bottom, followed by a layer of banana slices. Next, pour a layer of the pudding mixture over the bananas.
Continue these layers until you run out of ingredients, ensuring the top layer is pudding. Finish off with a beautiful topping of whipped cream. Not only does this add a delightful touch, but it also gives you that classic dessert look.
Refrigerate and Set the Pudding
Once your layers are all in place, it’s time to let the magic happen. Cover the dish with plastic wrap and place it in the fridge for at least four hours—or overnight if you can wait! This chilling time allows the flavors to meld beautifully and thickens the pudding.
Did you know that letting desserts sit overnight often makes them taste even better? Your easy banana pudding will be far more flavorful after it’s had some time to rest!
Final Touches Before Serving
Right before serving, take your dish out of the fridge and add some extra whipped cream on top if desired. You can also garnish it with additional slices of banana and a sprinkle of crushed vanilla wafers for added texture.
Finally, share your delightful creation with friends and family. Watch as their faces light up with joy when they savor the flavors of your homemade easy banana pudding.
Enjoy this classic dessert and remember, cooking is all about enjoyment! If you’d like to explore more delicious recipes, check out Food Network for ideas and inspiration. Happy cooking!
Variations of Easy Banana Pudding
Chocolate Banana Pudding Twist
If you’re a chocolate lover, try adding cocoa powder or melted chocolate to your easy banana pudding base. This rich twist on the classic dessert combines the delightful sweetness of bananas with the deep flavor of chocolate. Simply mix in about a half-cup of cocoa powder with your pudding mixture, or fold in some melted chocolate for a fudge-like consistency. Top with chocolate shavings or even mini chocolate chips for an extra indulgent touch!
Vegan Banana Pudding for Dairy-Free Options
For those following a vegan lifestyle, you can still enjoy this delicious dessert! Substitute traditional dairy ingredients with plant-based alternatives. Use almond milk or coconut milk to make the pudding, and opt for dairy-free whipped topping. You can even use silken tofu blended until smooth as a creamy base. This way, you get a luscious easy banana pudding without compromising your dietary choices.
Adding Crunch: Incorporating Nuts or Granola
Looking for a little crunch in your easy banana pudding? Consider adding some texture with nuts or granola. Chopped walnuts or pecans not only enhance the flavor but also add a nutritional boost. If you prefer something sweeter and crunchier, sprinkle a layer of granola on top before serving. This not only provides a satisfying bite but also elevates the presentation of your dessert!
These variations are just a few ways to elevate your easy banana pudding. Feel free to experiment and share your delicious results with friends! For more tips on pudding variations, check out resources from Serious Eats and Bon Appétit for inspiration!
Cooking Tips and Notes for Easy Banana Pudding
Best Practices for Layering Ingredients
Creating easy banana pudding is an art, and getting the layering just right enhances both its look and taste. Start with a layer of the creamy pudding at the bottom of your serving dish—a smooth base helps prevent the bananas from browning too quickly. Alternate between layers of sliced bananas and crushed vanilla wafers, ensuring every scoop has a bit of each ingredient. Top it off with a final spread of whipped cream for that perfectly inviting finish.
How to Choose Ripe Bananas
Ripe bananas are crucial for that sweet, luscious flavor. Look for bananas that are fully yellow with a few brown spots; they should feel slightly soft to the touch. Avoid overly green or dark brown ones, as these can affect the overall taste and texture of your easy banana pudding. Need a quick reference? Check out this useful guide on choosing bananas.
Storing Leftovers: Tips to Keep It Fresh
If you find yourself with leftover pudding, store it in the refrigerator in an airtight container to keep it fresh. To prevent the bananas from browning, consider adding a splash of lemon juice over them before covering. Enjoy your creamy treat within a couple of days for the best taste and texture. Want to make sure you’re maximizing flavor and freshness? Here’s a quick link to banana storage tips to help you out!
Serving Suggestions for Easy Banana Pudding
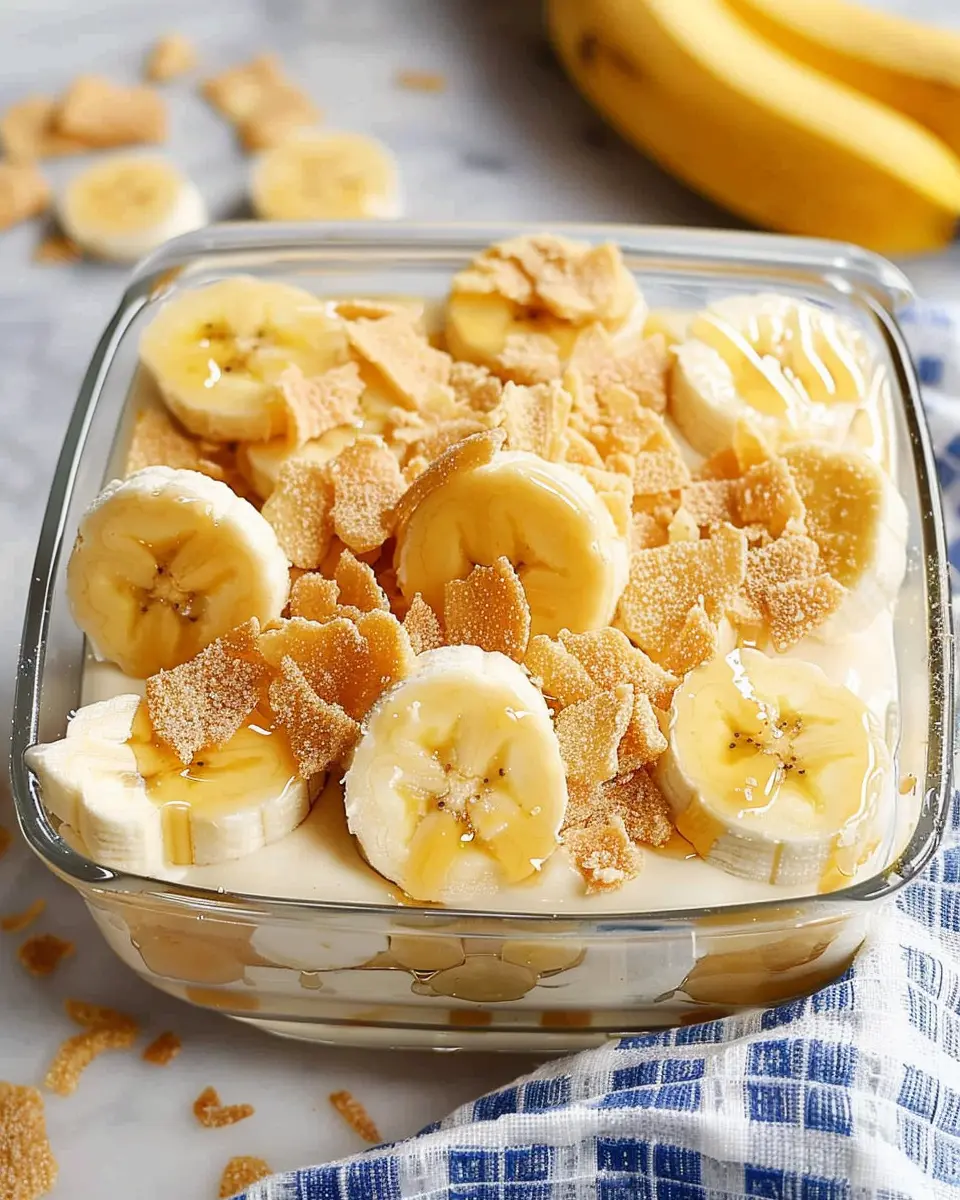
Creative Ways to Present the Dish
When it comes to serving easy banana pudding, presentation can make all the difference. Consider layering the pudding in clear dessert cups or mason jars to show off its delightful layers of creamy goodness and banana slices. Adding a dollop of whipped cream on top and a sprinkle of crushed vanilla wafers can elevate this classic dessert.
Pairing Suggestions: What to Serve with Banana Pudding
This classic dessert pairs beautifully with various dishes. Try serving it alongside:
- Grilled chicken sandwiches
- Fresh fruit salad for a refreshing side
- Turkey bacon sliders for a savory balance
These options provide a delightful contrast and complement the sweetness of the pudding, ensuring a well-rounded meal.
Fun Serving Vessel Alternatives
Feeling adventurous? Instead of going for standard serving bowls, consider these exciting alternatives:
- Mini cups for individual servings—perfect for parties!
- Edible waffle bowls that match the pudding’s creamy texture
- In long dessert glasses, which allow for stunning layering
With these creative ideas, your easy banana pudding will not only taste amazing but also impress your guests visually!
Time Breakdown for Easy Banana Pudding
When you’re craving a delicious dessert, knowing how long it takes to whip up an easy banana pudding can make all the difference. Here’s a quick breakdown:
Preparation Time
Expect to spend about 20 minutes prepping your ingredients. This includes slicing your bananas, mixing the pudding, and layering everything together. Quick and simple, right?
Resting Time
After assembling your pudding, let it rest in the fridge for 4 hours. This crucial step allows the flavors to meld beautifully – a little patience goes a long way!
Total Time for the Recipe
In total, you’re looking at 4 hours and 20 minutes from start to finish. That’s just a few hours before you can dig into this delightful treat! For more dessert inspiration, check out Serious Eats for tips on pudding variations and more.
Nutritional Facts for Easy Banana Pudding
Calories and Portion Size
When it comes to easy banana pudding, knowing the calorie count can help you indulge without guilt. A typical serving size (about one cup) contains approximately 200-250 calories, making it a delightful dessert that can fit into a balanced diet. Just remember to enjoy it in moderation, especially if you’re tempted to go back for seconds.
Key Nutrients of the Dessert
Not only is banana pudding delicious, but it also offers some surprising nutritional benefits. Each serving generally provides:
- Vitamins: Rich in Vitamin C and B6 from bananas
- Minerals: Contains potassium, crucial for heart health
- Carbohydrates: Offers energy, perfect after a long day
For a deeper dive, you can explore NutritionData to see how bananas and other ingredients stack up nutritionally.
Overall Health Considerations
Though tempting, it’s worth noting that easy banana pudding can be high in sugar and fat if prepared with excessive sweeteners or heavy creams. If you’re looking to lighten it up, consider using Greek yogurt or a plant-based milk alternative. This way, you can savor the flavor while making a healthier choice.
In the quest for a tasty yet nutritious treat, balancing indulgence with health consciousness is key. How do you enjoy your banana pudding?
FAQs about Easy Banana Pudding
How long can banana pudding be stored in the fridge?
When it comes to easy banana pudding, you’ll want to savor its deliciousness while it’s fresh. Generally, homemade banana pudding can be stored in the fridge for 3 to 5 days. Just be sure to keep it tightly covered, so it doesn’t absorb any other odors. To maintain quality, it’s best to add the bananas closer to serving time; this helps prevent them from browning too quickly.
Can I make banana pudding the day before serving?
Absolutely! In fact, prepping your easy banana pudding a day ahead can enhance its flavor. When allowed to rest in the fridge overnight, the ingredients meld perfectly, producing a richer and creamier texture. Simply layer everything in your dish and refrigerate it, uncovered, overnight. If you prefer, you can add the banana slices just before serving to keep them looking fresh.
What’s the secret to a creamy pudding texture?
Achieving that dreamy, creamy consistency in your banana pudding comes down to a couple of key factors:
- Quality Ingredients: Start with a good quality instant pudding mix and whole milk for a richer taste.
- Mixing Techniques: Be sure to whisk your ingredients thoroughly to avoid lumps. If you prefer an even silkier texture, consider folding in some whipped cream or whipped topping.
For more tips on pudding textures, check out this article on the science of pudding from Serious Eats.
Next time you whip up a batch of easy banana pudding, keep these tips in mind for a delightful dessert that impresses every time!
Conclusion on Easy Banana Pudding
Recap of Why You Should Try This Easy Recipe
If you’re looking for a delicious and simple dessert, this easy banana pudding is a must-try! With its creamy layers of vanilla pudding, fresh bananas, and whipped cream, it’s the perfect treat for any gathering or even just a cozy night in. Plus, it comes together quickly with minimal effort, making it a perfect choice for busy young professionals.
Encouragement to Experiment with Your Own Variations
Feel free to get creative! Swap regular bananas for chocolate ones or add a dash of cinnamon for a new twist. Don’t hesitate to explore different toppings; crushed cookies or a sprinkle of nuts can elevate this treat even further. Check out options for customizing desserts in this Food Network article.
Final Thoughts on Homemade Desserts vs. Fast Food
Homemade treats like this easy banana pudding not only taste better but are also made with love and care. You know exactly what goes into your dessert, allowing you to savor each bite guilt-free. So, next time you’re tempted by store-bought sweets, remember the joy and satisfaction that comes from whipping up your own creations!
PrintEasy Banana Pudding: A Delightfully Indulgent Homemade Treat
Experience the joy of a classic dessert with this easy banana pudding recipe that is sure to impress!
- Prep Time: 20 minutes
- Total Time: 4 hours 20 minutes
- Yield: 6 servings 1x
- Category: Dessert
- Method: No-bake
- Cuisine: American
- Diet: Vegetarian
Ingredients
- 4 ripe bananas
- 1 box (5.1 oz) vanilla instant pudding mix
- 3 cups milk
- 1 (8 oz) container whipped topping
- 1 package vanilla wafers
Instructions
- In a mixing bowl, whisk together the vanilla pudding mix and milk for about 2 minutes until well combined. Let it sit for 5 minutes to thicken.
- In a large serving dish, layer the vanilla wafers on the bottom, then add a layer of sliced bananas.
- Pour half of the pudding mixture over the bananas and wafers.
- Repeat the layering process with more wafers, bananas, and the remaining pudding mixture.
- Top with whipped topping and refrigerate for at least 4 hours before serving.
Notes
- For best results, use ripe bananas that are slightly soft.
- Feel free to add a sprinkle of crushed vanilla wafers on top for added texture.
Nutrition
- Serving Size: 1 cup
- Calories: 350
- Sugar: 24g
- Sodium: 200mg
- Fat: 15g
- Saturated Fat: 7g
- Unsaturated Fat: 6g
- Trans Fat: 0g
- Carbohydrates: 52g
- Fiber: 1g
- Protein: 4g
- Cholesterol: 20mg
Keywords: Easy Banana Pudding