Introduction to Crusty Italian Bread
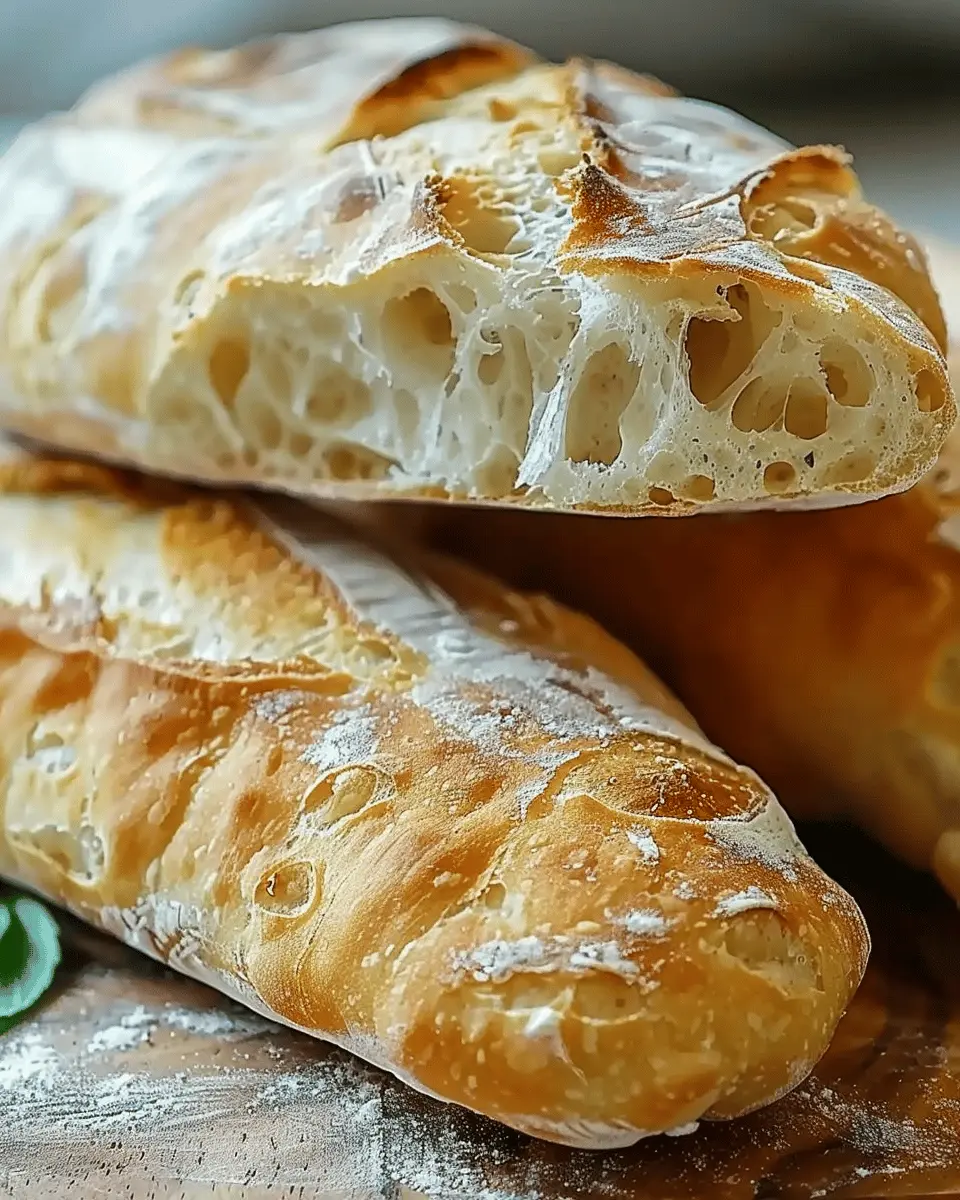
When you think of comfort food, there’s something undeniably wholesome about freshly baked bread. Crusty Italian Bread has long been a staple in Italian culinary tradition, and for good reason. The aroma that wafts through your kitchen while it bakes is hard to compete with, and the crustiness that greets you upon the first slice? Pure bliss. Baking your own bread may seem daunting, but it’s truly one of those rewarding culinary feats that pays off in both flavor and in the joy it brings.
Why Homemade Bread is Worth It
Let’s be honest: there’s a certain magic to homemade products, and bread is no exception. Eating homemade bread is a game changer, especially when you consider the ingredients. You control what goes into your dough—no preservatives or mysterious additives, just basic ingredients that you’re proud to put on your table. Plus, baking at home allows you to customize your flavors and textures.
Research suggests that homemade bread can actually be healthier than store-bought options, possibly due to the absence of chemical emulsifiers and stabilizers. According to a study featured in The Journal of Nutrition, bread made from whole grain flours can provide additional fiber and nutrients compared to refined options you often find on grocery shelves.
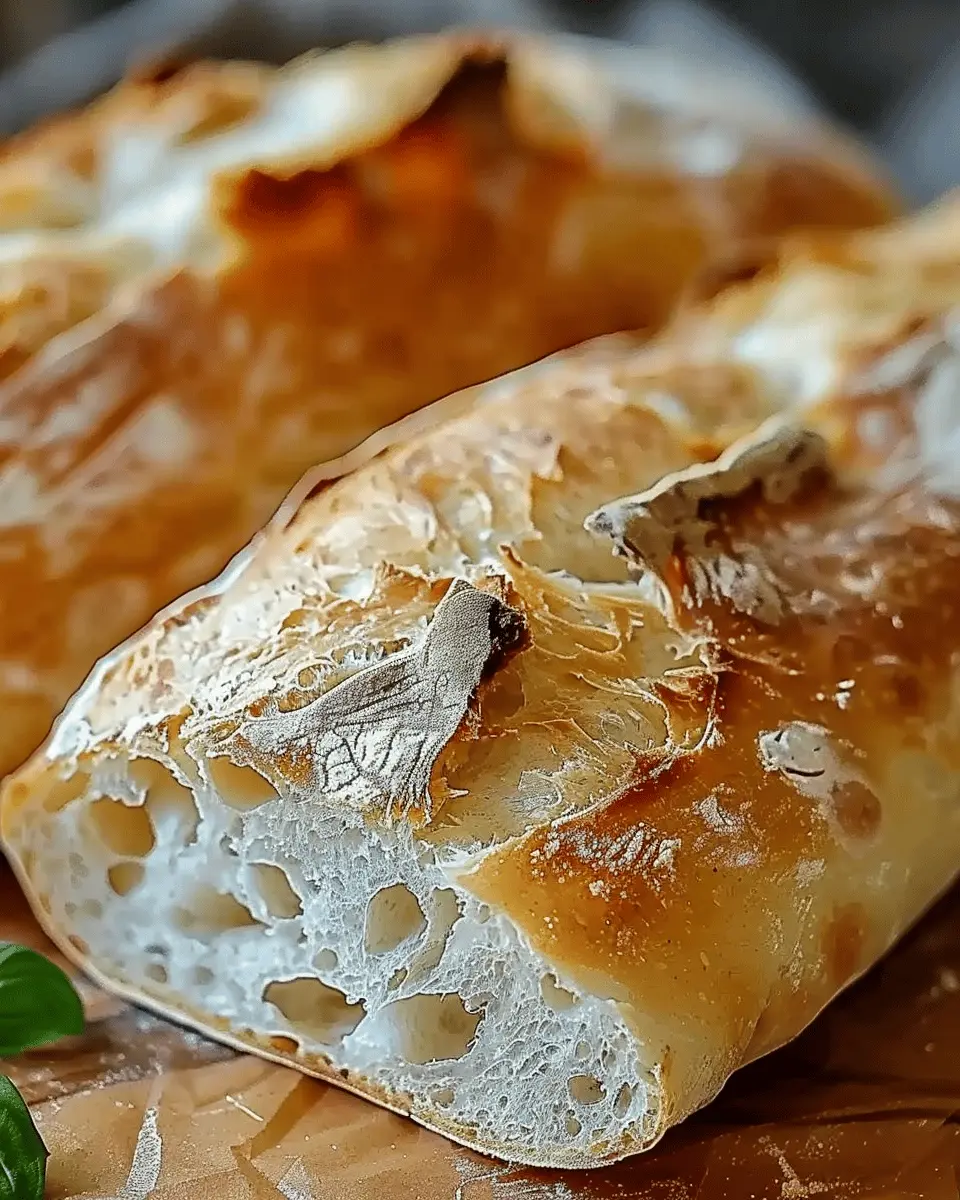
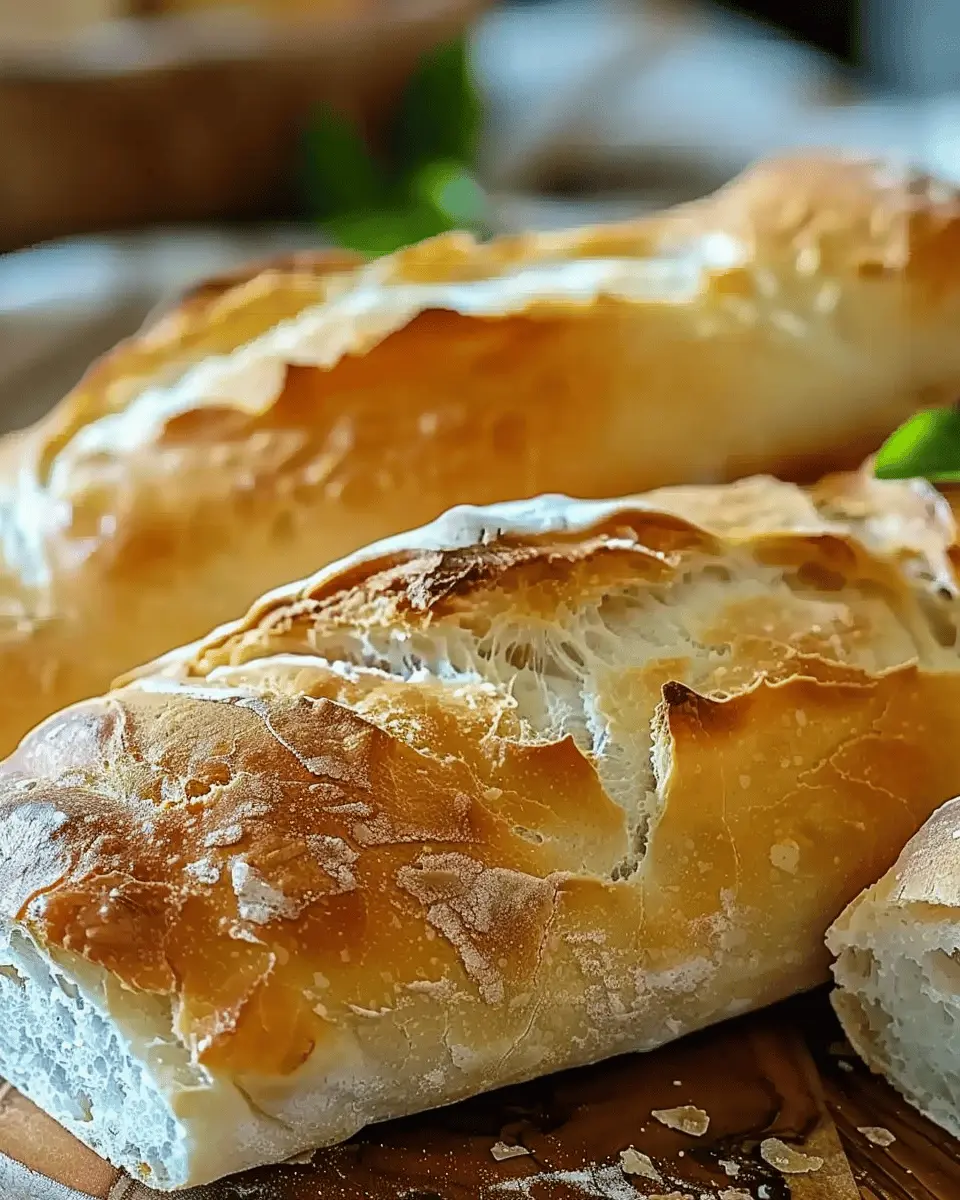
If you’re a fan of Crusty Italian Bread, you’re likely familiar with the satisfying sound of that crust crackling as you slice into it. Just imagine pairing your bread with a homemade garlic spread or using it to mop up a hearty soup. It’s more than just a side item; it’s a means to elevate your meals.
Have you ever noticed the joy in sharing homebaked goods? There’s something special about gifting or sharing slices of your own bread with friends and family. It’s a heartwarming home gesture that puts a smile on everyone’s face.
So why not give it a try? Baking Crusty Italian Bread at home is not just a delicious endeavor; it’s also a fulfilling creative outlet—an enjoyable process that turns a simple ingredient list into something genuinely special. Let’s dive into the recipe so you can start your own baking journey today!
Ingredients for Crusty Italian Bread
Essential Ingredients for Perfect Crust
When crafting your Crusty Italian Bread, the right ingredients are key to achieving that impeccable, golden-brown crust. Here’s what you’ll need:
- All-Purpose Flour: Opt for high-quality all-purpose flour as the foundation of your dough. The protein content affects gluten development, which in turn gives your bread its elasticity.
- Water: Use lukewarm water to activate the yeast effectively, creating the perfect environment for fermentation. Remember, the temperature shouldn’t be too hot; aim for about 110°F (43°C).
- Yeast: Active dry yeast is ideal for this recipe. If you prefer, you can also use fresh yeast, which can lend a slightly different flavor profile.
- Salt: A crucial ingredient that enhances flavor and strengthens the gluten structure. Sea salt or kosher salt works best.
- Olive Oil: Not only does it add a rich flavor, but it also helps maintain moisture in your bread, preventing it from becoming too dry.
For more insights on utilizing these ingredients, consider exploring articles on The Kitchn or King Arthur Baking. Happy baking!
Step-by-Step Preparation of Crusty Italian Bread
Baking Crusty Italian Bread at home can be a rewarding experience, filling your kitchen with the delightful aroma of fresh bread. This guide will take you through the steps to achieve that perfect crust every time. Trust me, with a little patience and attention, you’ll impress your friends and family with your own homemade loaf!
Activate the Yeast
First things first: we must wake up the yeast! In a small bowl, combine about 1 cup of warm water (around 110°F or 43°C) with 2 teaspoons of active dry yeast. Allow this mixture to sit for about 5 to 10 minutes until it becomes frothy. This indicates that your yeast is alive and kicking! If you’re uncertain about the yeast’s potency, check out this helpful article on yeast activation for more tips.
Combine Dry Ingredients
While your yeast is waking up, grab a large mixing bowl and combine 4 cups of bread flour, 2 teaspoons of salt, and 1 teaspoon of sugar. The sugar will not only add a hint of sweetness but also help the yeast thrive. Mix these dry ingredients well, ensuring that the salt is evenly distributed, as it can inhibit yeast activity if it comes into direct contact.
Form the Dough
Once your yeast is activated, add it to the dry ingredients along with another cup of warm water. Mix it with a wooden spoon until it starts to come together. You’ll want a sticky, shaggy dough—don’t be tempted to add too much flour just yet! Transfer the dough to a lightly floured surface and knead it for about 10 minutes. The goal is to develop the gluten, which contributes to that perfect chewy texture in your Crusty Italian Bread.
First Rise – Let It Grow!
Now that you have a lovely dough, place it in a lightly greased bowl and cover it with a clean kitchen towel or plastic wrap. Let it rise in a warm place for 1 to 1.5 hours or until it doubles in size. This is an excellent time to relax or prepare a delicious dip or spread to enjoy with your fresh bread.
Preheat Your Oven
About 30 minutes before you’re ready to bake, preheat your oven to 450°F (232°C). If possible, place a Dutch oven or baking stone in the oven while it preheats. This will help create a more consistent baking environment and that fabulous crust we’re after.
Shape the Loaf
After your dough has risen, gently deflate it on a floured surface. Shape it into a round or oval loaf, depending on your preference. To achieve a round shape, tuck the dough edges underneath to create surface tension. Let it rest for about 10 minutes; a little break helps it relax for the next rise.
Second Rise – Patience Pays Off
Now it’s time for the second rise! Place your shaped loaf on a piece of parchment paper and cover it with a towel. Let it rise for another 30 to 45 minutes. The dough should puff up again. A little tip: sprinkle some flour over the top before covering it to prevent sticking.
Scoring the Loaf
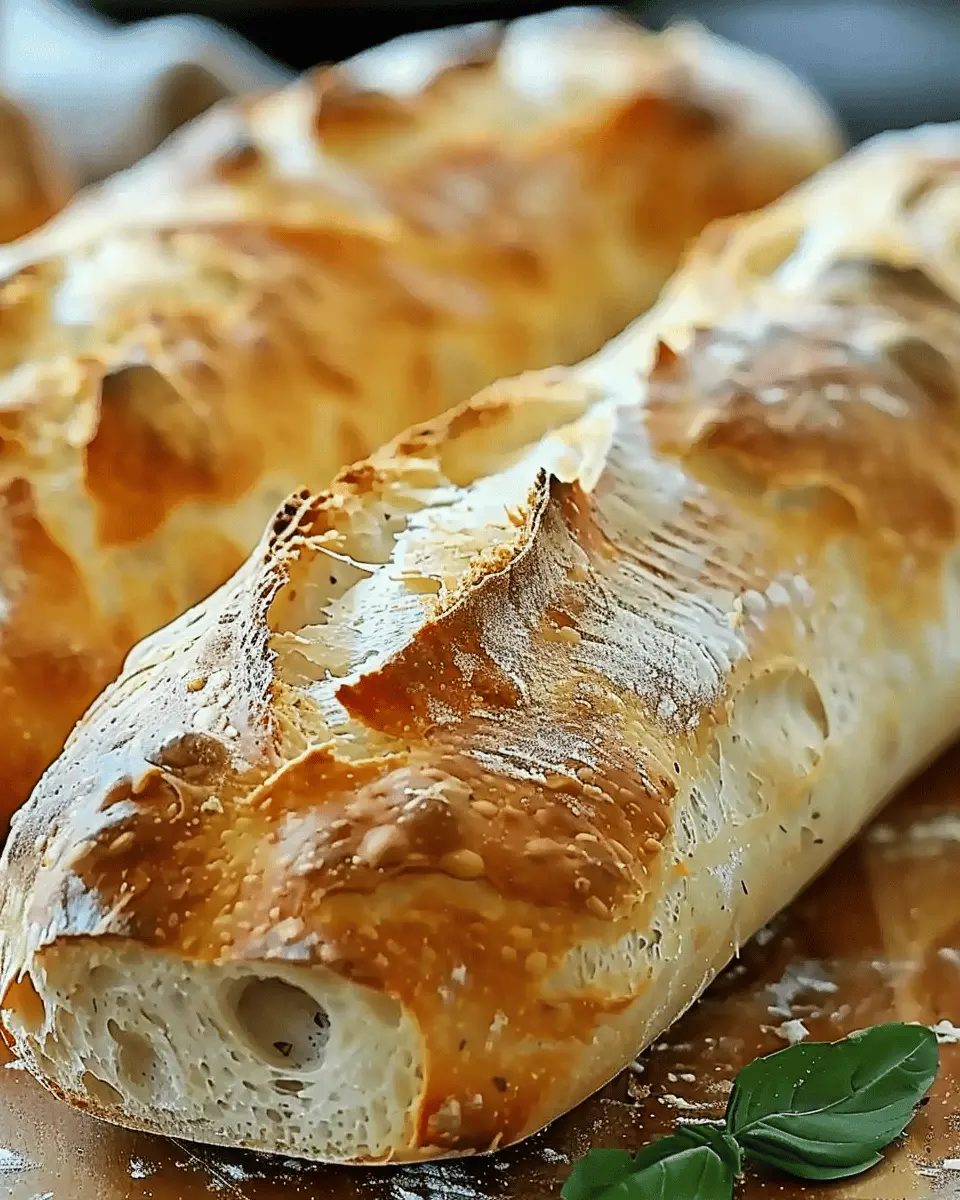
Once the dough has risen, it’s time to score. Using a sharp knife or a bread lame, make a few shallow cuts in a pattern of your choice on the top of the loaf. This not only adds a decorative touch but also allows steam to escape, which is crucial for creating that desirable crust.
Bake to Golden Perfection
Carefully transfer the loaf to your preheated oven (or Dutch oven). Bake for 25 to 30 minutes, or until the bread is a beautiful golden brown and sounds hollow when tapped on the bottom. Remove it from the oven and let it cool on a wire rack for at least 30 minutes before slicing. This might be the hardest part, but the wait is worth it!
Now you have your very own Crusty Italian Bread ready to serve at dinner or pair with your favorite spreads. Enjoy the baking process, and don’t hesitate to share your successes (and learnings) along the way!
Variations on Crusty Italian Bread
Exploring variations of Crusty Italian Bread can be an exciting culinary adventure! Whether you’re hosting a dinner party or just craving something special, these variations will elevate your bread game.
Herb-Infused Crusty Italian Bread
Imagine slicing into a warm loaf of Crusty Italian Bread infused with aromatic herbs. This variation is simple yet impactful. You can add fresh herbs like rosemary, thyme, or basil directly into your dough. The key is to finely chop them so they distribute evenly throughout. Consider pairing this with a dish you love, like a classic marinara sauce or a flavorful olive oil dip.
- Tips:
- Use a mix of dried herbs if fresh isn’t available; they can provide a lovely depth of flavor.
- Experiment with garlic powder for an additional kick.
Olive and Cheese Crusty Italian Bread
For a heartier twist, try Crusty Italian Bread packed with olives and cheese! Chopped Kalamata olives or green olives can give your bread a savory punch. Mixing in cheeses like mozzarella or parmesan before baking will create delightful pockets of gooey goodness.
- Suggestions:
- Pair with a light salad for a perfect lunch option.
- Serve warm with a side of tomatoes and fresh basil for an Italian treat.
These variations not only enhance your bread-baking experience but also allow you to showcase your creativity in the kitchen. Remember, baked bread is best enjoyed fresh, so gather your ingredients and get baking! For more inspiration, check out Serious Eats or Bon Appétit for additional recipes and tips. Happy baking!
Cooking Tips and Notes for Crusty Italian Bread
Tips for Achieving the Perfect Crust
Baking Crusty Italian Bread at home can be an incredibly rewarding experience. To achieve that delightful crust, consider these helpful tips:
-
Use a Baking Stone or Steel: Preheating a baking stone or steel in your oven for at least 30 minutes will help create that perfect crispy crust you crave. The intense, even heat will bake the bread beautifully.
-
Steam It Up: Introducing steam into the oven during the first few minutes of baking can enhance the crust’s texture. You can place a pan of water on the oven floor or use a spray bottle to mist the bread lightly.
-
Let It Rest: Patience is crucial! Allow your Crusty Italian Bread to cool completely before slicing. This resting period lets the crust set and the flavors develop fully.
-
Use Quality Ingredients: Opt for high-protein bread flour for the best outcomes. A good quality flour makes a significant difference in texture and flavor, allowing you to create bakery-worthy bread at home.
Baking is a journey, and enjoying the process is just as important as the end result. For more tips on bread baking, check out King Arthur Baking for expert advice. Happy baking!
Serving Suggestions for Crusty Italian Bread
Pairing Your Bread with Delicious Dips
Crusty Italian Bread is more than just a side; it’s a canvas for endless culinary creativity! One of the easiest ways to elevate your bread game is by pairing it with flavorful dips. Have you ever considered how a warm slice of your freshly baked bread can be transformed into an exquisite tasting experience? Here are a few fantastic options:
-
Olive Oil and Balsamic Vinegar: Drizzle high-quality extra virgin olive oil and aged balsamic vinegar for a classic Italian experience. It’s simple yet sophisticated.
-
Hummus: Spread creamy hummus topped with roasted red peppers or olives for a hearty snack. It’s healthy, too!
-
Tapenade: This briny mix of olives, capers, and anchovies makes for a bold flavor that complements the crusty texture perfectly.
-
Pesto: Try using basil pesto as a dip or spread. The fresh herbs and nuts will enhance the rustic flavor of your bread.
These combos aren’t just delicious; they also allow you to explore various tastes and textures while impressing friends at your next gathering. So, how do you like to enjoy your Crusty Italian Bread? Explore more ideas on serving bread here The Bread Lovers!
Time Breakdown for Crusty Italian Bread
Preparation Time
Making your Crusty Italian Bread starts with a 15-20 minute preparation session. This includes mixing your ingredients and kneading the dough, which is essential for developing that signature chewy texture. If you’re new to bread-making, don’t worry! Taking the time to knead is both a workout and a meditation.
Baking Time
Once your dough has risen beautifully, it will need about 30-35 minutes in the oven. You’ll want to keep an eye on it as it bakes, ensuring that perfect golden crust you crave. The aroma wafting through your kitchen will be irresistible, prompting you to let the neighbors in on your delicious creation.
Total Time
In total, you’re looking at around 3-4 hours for the entire process. This includes rising time, which is crucial for achieving that lovely texture. But don’t let the time deter you! Much of it is hands-off, allowing you to prep the rest of your meal, perhaps with some delightful spreads or a hearty soup.
Embrace the process, and before you know it, you’ll have a loaf of Crusty Italian Bread that’s worth every minute spent! For more tips, you might want to check out sources like The Bread Baker’s Apprentice for expert advice on bread-making.
Nutritional Facts for Crusty Italian Bread
Calories per Slice
When you indulge in a slice of Crusty Italian Bread, you can expect approximately 80-100 calories. This makes it a delightful addition to your meals without overloading your calorie count. Pair it with olive oil or a vibrant dip, and you’ve got a snack that satisfies without the guilt.
Fiber and Nutrients
One of the benefits of homemade Crusty Italian Bread is its potential for added nutritional value. If you opt for whole wheat flour, you’ll increase your fiber intake significantly, promoting digestive health. Interestingly, whole grains can support heart health, so consider sprinkling in some seeds or utilizing whole grain flour to amp up the nutritional profile.
Keep in mind, adding toppings like avocado or turkey bacon can elevate both flavor and nutrition, making your meals more balanced. For detailed insights on the health benefits of grains, check out resources from the Whole Grains Council. Enjoy your baking!
FAQs about Crusty Italian Bread
When it comes to baking Crusty Italian Bread, a few common questions often pop up. Let’s dive into some FAQs that can enhance your baking experience!
How do I store homemade crusty bread?
To keep your Crusty Italian Bread fresh and delicious, store it in a paper bag at room temperature. This method allows the bread to breathe, retaining its crispy crust while preventing mold. If you need to keep it for an extended period, avoid plastic, as it traps moisture. Instead, consider using a bread box for a cozy home, or wrap it tightly in foil.
Can I freeze Crusty Italian Bread?
Absolutely! Freezing is a great way to preserve your Crusty Italian Bread. Slice it before packaging – this helps you pull out just what you need without thawing the entire loaf. Make sure to wrap it in plastic wrap or aluminum foil, then place the wrapped bread in a freezer bag for added protection. It can last up to three months in the freezer. When you’re ready to enjoy it, let it thaw at room temperature and refresh it in the oven to restore that wonderful crust.
Why is my bread not crusty enough?
If your Crusty Italian Bread is lacking that desirable crunch, a few factors might be at play:
- Baking Temperature: Ensure your oven is preheated properly—ideally, around 450°F (232°C). A hot oven is crucial for that crust development.
- Steam Creation: Adding steam during the first part of baking helps create a crusty exterior. You can place a tray with water at the bottom of the oven or mist the bread with water before baking.
- Over-proofing: If your dough rises too long, it can lose structure, leading to a soft crust. Watch the fermentation time closely!
By addressing these points, you’ll be well on your way to achieving that perfect crust every time!
For more tips on baking bread, check out resources like King Arthur Baking and Serious Eats to elevate your skills further!
Conclusion on Crusty Italian Bread
Embrace Baking Your Own Bread!
Baking your own crusty Italian bread is not just a culinary adventure; it’s a way to connect with your food and surroundings. Imagine pulling a fresh loaf from the oven, its golden crust crackling as it cools. The aroma envelops your kitchen, inviting anyone nearby to take part in this delightful experience. As you perfect your technique, remember that the beauty of homemade bread lies in its imperfections—every loaf tells its own story.
So grab your apron, gather your ingredients, and embrace the joy of baking! For more tips on bread-making, check out resources from King Arthur Baking or The Kitchn. Happy baking!
Crusty Italian Bread: Bake the Perfect Crust Every Time

Learn how to bake crusty Italian bread that has the perfect crust every time with this easy-to-follow recipe.
- Prep Time: 15 minutes
- Cook Time: 50 minutes
- Total Time: 18 hours 5 minutes
- Yield: 1 loaf 1x
- Category: Bread
- Method: Baking
- Cuisine: Italian
- Diet: Vegetarian
Ingredients
- 4 cups all-purpose flour
- 1 tablespoon salt
- 1 teaspoon sugar
- 1.5 teaspoons instant yeast
- 1.5 cups warm water
Instructions
- In a large bowl, mix the flour, salt, sugar, and instant yeast together.
- Add the warm water and stir until a shaggy dough forms.
- Cover the bowl with plastic wrap and let it rise for 12-18 hours at room temperature.
- After rising, shape the dough into a ball and let it rest on a floured surface, covered, for 1-2 hours.
- Preheat your oven to 450°F (232°C) and place a Dutch oven inside to heat up.
- Once preheated, carefully transfer the dough into the Dutch oven and cover.
- Bake for 30 minutes with the lid on, then remove the lid and bake for an additional 15-20 minutes until browned.
- Cool on a wire rack before slicing.
Notes
- For a deeper flavor, consider adding herbs or garlic to the dough.
- Use a cooking thermometer to check internal temperature for perfect doneness.
Nutrition
- Serving Size: 1 slice
- Calories: 120
- Sugar: 1g
- Sodium: 400mg
- Fat: 1g
- Saturated Fat: 0g
- Unsaturated Fat: 1g
- Trans Fat: 0g
- Carbohydrates: 24g
- Fiber: 1g
- Protein: 4g
- Cholesterol: 0mg
Keywords: Crusty Italian Bread, Bake Perfect Crust, Bread Recipe